
13.SNR10_ClassicTest
This section is to measure the actual SNR10 with the classic methodology. SNR10 with CCM applied is very useful to validate a camera sensor system noise performance, the smaller of the tested result, the better of the camera system noise performance.
Image capturing conditions
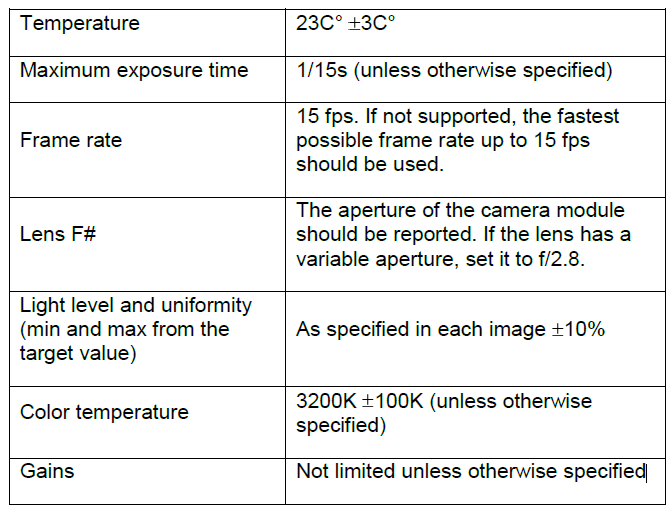
Below table shows the default image capturing conditions. Any required deviations from these conditions will be reported to customer separately in each case. The specified light levels mean the amount of light coming to the target.
Try to avoid using flickering light sources as they might degrade the results.
Image capturing conditons
snr10condition
Measuring the light level
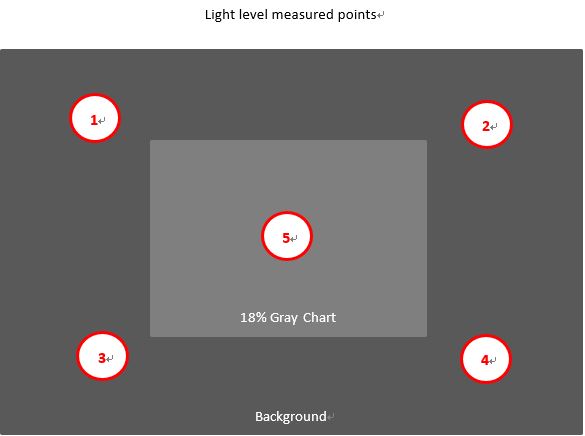
The light levels specified in this document mean the amount of light coming to a target. An example of measuring the light level and uniformity correctly is illustrated as below figure.
Images to be captured
18% gray chart should be used as a target picture. The chart should be placed at the center of a deep gray background so that the chart roughly fills 1/4 of the image area like above. Please make sure chart location and size is setup correctly as this requirement otherwise it may cause incorrectly result.
Esser TE182 Target Chart
Only flat targets are allowed. Wrinkles, fingerprints or other kind of defects are not acceptable. In addition, problems in the light source, like flickering are not allowed. Poor images will give worse results.
The gray uniform target must have a reflectance of 18%. The grey uniform chart should be Esser TE182 neutral grey chart. Some other chart is also acceptable if similar characteristics to the Esser chart are achieved.
Below table shows the required gray images to be captured. The capturing conditions applied as above table specified unless otherwise defined. The lenses should be driven to hyperfocal or proper distance so that the target is within the DOF range, slightly defocused is no matter.
|
File name for RAW
|
Notes
|
||
| 10 lux | Gray_0010lux.raw
|
|
||
| 30 lux | Gray_0030lux.raw | Gr color channel should be exposed to 18% (excluding the pedestal) at the center of the image if it can be achieved. | ||
| 60 lux | Gray_0060lux.raw | Gr color channel should be exposed to 18% (excluding the pedestal) at the center of the image if it can be achieved. | ||
| 100 lux | Gray_0100lux.raw | Gr color channel should be exposed to 18% (excluding the pedestal) at the center of the image if it can be achieved. | ||
| 200 lux | Gray_0200lux.raw | Gr color channel should be exposed to 18% (excluding the pedestal) at the center of the image if it can be achieved. |
Noted that the size of the center is 10% of the height and width of the images.
CamAnalyzer SNR10_ClassicTest
Run SNR10_ClassicTest from CamAnalyzer and follow below steps to have SNR10 measurement done.
Step1 : Load CCM ( color correction matrix stored in a csv file)
Step2 : Input the target reflectance as 0.18, and the actual chart reflectance such as 0.19 which it can be obtained from bought chart paper information or actual tested. Light level calibration will be done with the reflectance. If the actual reflectance is to use a default value such as 0.18, the accuracy is slight worse without light level calibrated, otherwise it is accepted by customer.
Step3: Load raw image of ‘10lux target’
Step4: Input actual measured lux level for ’10 lux target’ condtion.
Step5: Repeat step3~step4 until other raw images of different conditions are loaded.
Step6: Calculate and result will be shown in the figure.
An example figure as below:

The final SNR10 result with CCM applied is dependent on the camera system include Lens F#, transmissions, sensor QE and sensor noise performance.
Spec limit should be case by case defined according to system design and image quality requirement at the beginning of project.